Spring Security Architecture
배경
- Spring Security 6.1.4
CsrfFilter
유저가 로그인할 수 있는 어플리케이션에서는 CSRF 방어가 중요하다. Spring Security는 기본적으로 POST 요청과 같은 안전하지 않은 HTTP 메서드에 대해 CSRF 공격을 방어하므로 추가 코드가 필요하지 않다.
1
2
3
4
5
6
7
8
9
10
11
12
@Configuration
@EnableWebSecurity
public class SecurityConfig {

	@Bean
	public SecurityFilterChain securityFilterChain(HttpSecurity http) throws Exception {
		http
			// ...
			.csrf(Customizer.withDefaults());
		return http.build();
	}
}
Understanding CSRF Protection’s Components
CSRF 방어는 CsrfFilter안에 구성된 몇몇의 컴포넌트들로부터 이루어진다.
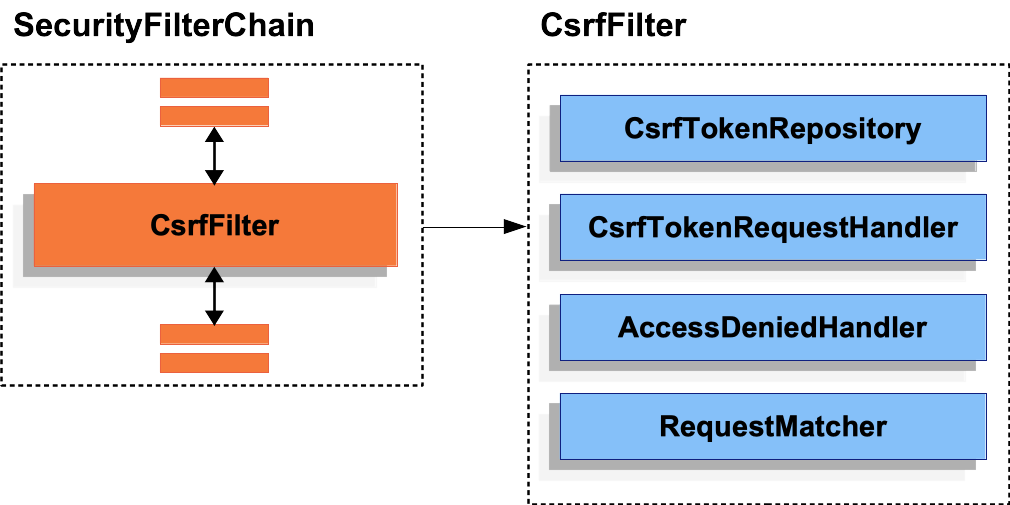
CSRF 방어는 크게 두 단계로 나뉘어진다.
CsrfTokenRequestHandler가 어플리케이션에서 사용가능한CsrfToken을 발급한다.- 만약 요청이 CSRF 방어를 필요로하면, 토큰을 불러와 검증한 뒤
AccessDeniedException예외를 처리한다.
Persisting the CsrfToken
CsrfToken은 CsrfTokenRepository에 저장된다.
기본적으로, HttpSessionCsrfTokenRepository는 세션에서 토큰을 저장하는 용도로 사용된다. 또한, Spring Security는 쿠키에서 토큰을 저장하기 위한 CookieCsrfTokenRepository도 제공한다. 그 외에도 선호하는 방식으로 토큰을 저장할 수 있는 방법도 제공한다.
Using HttpSessionCsrfTokenRepository
기본적으로 Spring Security는 HttpSessionCsrfTokenRepository를 사용해 세션안에 CSRF 토큰을 저장하는 것으로 동작한다. 따라서, 추가적인 코드는 필요없다.
HttpSessionCsrfTokenRepository는 HTTP 요청 헤더안에 X-CSRF-TOKEN 혹은 _csrf 이름을 가진 값을 기본으로 읽어온다.
1
2
3
4
5
6
7
8
9
10
11
12
13
14
@Configuration
@EnableWebSecurity
public class SecurityConfig {

	@Bean
	public SecurityFilterChain securityFilterChain(HttpSecurity http) throws Exception {
		http
			// ...
			.csrf((csrf) -> csrf
				.csrfTokenRepository(new HttpSessionCsrfTokenRepository())
			);
		return http.build();
	}
}
Using CookieCsrfTokenRepository
만약 Javascript 기반의 어플리케이션이라면 CookieCsrfTokenRepository를 이용해 쿠키안에 CsrfToken을 저장하는 것도 가능하다.
CookieCsrfTokenRepository는 XSRF-TOKEN 이름의 쿠키를 저장한다. HTTP 요청의 헤더 안에 X-XSRF-TOKEN 이름을 가진 값을 읽어오거나 _csrf 요청 파라미터를 기본적으로 읽어온다. 이런 기본 값들은 Angular로부터 유래했다.
1
2
3
4
5
6
7
8
9
10
11
12
13
14
@Configuration
@EnableWebSecurity
public class SecurityConfig {

	@Bean
	public SecurityFilterChain securityFilterChain(HttpSecurity http) throws Exception {
		http
			// ...
			.csrf((csrf) -> csrf
				.csrfTokenRepository(CookieCsrfTokenRepository.withHttpOnlyFalse())
			);
		return http.build();
	}
}
Customizing the CsrfTokenRepository
세션과 쿠키가 아닌 커스텀 CsrfTokenRepository도 사용가능하다.
CsrfTokenRepository 인터페이스를 구현해두면, Spring Security가 우리의 설정을 따르도록 할 수 있다.
1
2
3
4
5
6
7
8
9
10
11
12
13
14
@Configuration
@EnableWebSecurity
public class SecurityConfig {

	@Bean
	public SecurityFilterChain securityFilterChain(HttpSecurity http) throws Exception {
		http
			// ...
			.csrf((csrf) -> csrf
				.csrfTokenRepository(new CustomCsrfTokenRepository())
			);
		return http.build();
	}
}
UsernamePasswordAuthenticationFilter
Spring Security는 HTML form을 이용한 username-password 방식을 지원한다. 이번 장에서는 Spring Security에서 인증을 기반한 form이 어떻게 동작하는지 알아보자.
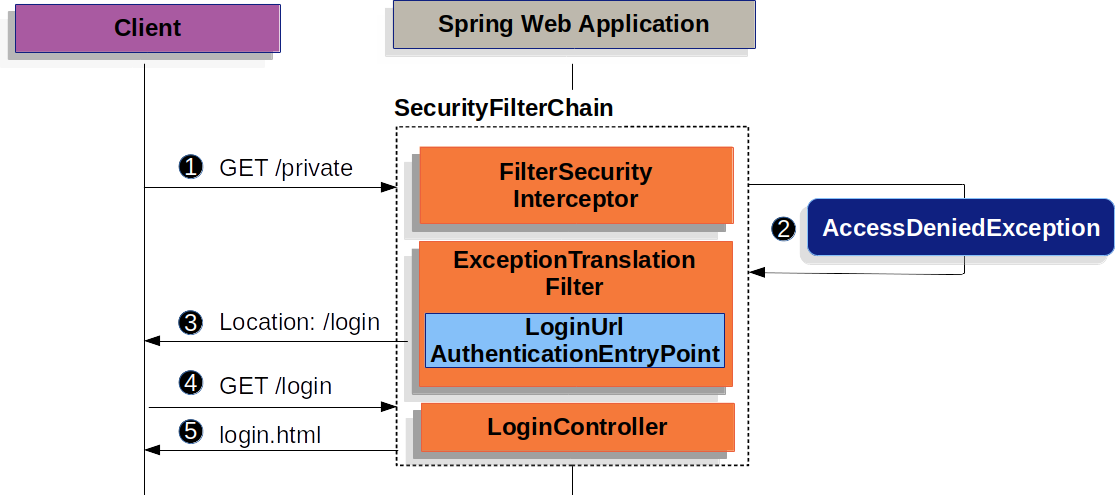
- 유저가 인증되지 않은 요청으로 인가되지 않은 자원에 접근한다.
- Spring Security의
AuthorizattionFilter는AccessDeniedException에외를 던지며 인증되지 않은 요청이라고 알려준다. - 유저가 인증되지 않았기때문에
ExceptionTranslationFilter는 인증을 시작하고AuthenticationEntryPoint로 설정된 로그인 페이지로 리다이렉트 시킨다. - 인터넷 브라우저는 리다이렉트된 페이지를 요청한다.
- 어플리케이션는 반드시 로그인 페이지를 렌더링 해야한다.
UsernamePasswordAuthenticationFilter는 제출된 username과 password를 인증한다.
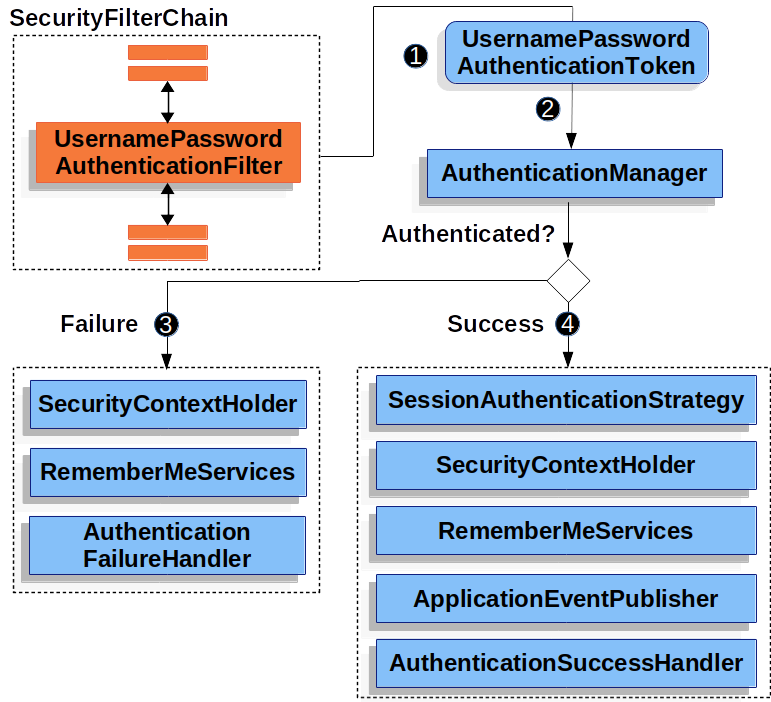
UsernamePasswordAuthenticationFilter는HttpServletRequest인스턴스로부터 유저가 제출한 username과 password를 추출한다. 얻은UsernamePasswordAuthenticationToken을 만든다. 이 토큰은 일종의 인증 역할을 한다.UsernamePasswordAuthenticationToken이AuthenticationManager인스턴스로 전달되어 인증된다.- 만약 인증이 실패한다면,
SecurityContextHolder가 사라진다.RemeberMeServices.loginFail이 발생한다. 만약 remember me가 설정되어 있지 않다면 동작하지 않는다.AuthenticationFailuerHandler가 발생한다.
- 만약 인증이 성공한다면,
SessionAuthenticationStrategy에 새 로그인 알림이 표시된다.SecurityContextHolder에Authentication이 설정된다.RememberMeServices.loginSuccess가 발생한다. 만약 remeber me가 설정되어 있지 않다면 동작하지 않는다.ApplicationEventPublisher가InteractiveAuthenticationSuccessEvent를 발행한다.AuthenticationSuccessHandler가 발생한다. 이것은 우리가 로그인 페이지로 리다이렉트하려고 할 때ExceptionTranslationFilter가 저장한 요청으로 리다이렉트하는SimpleUrlAuthenticationSuccessHandler이다.
Spring Security는 기본적으로 form login을 허용한다. 하지만 서블렛 기반의 설정을 적용하면 form을 사용한 login을 위해선 반드시 명시적으로 제공해야한다.
BasicAuthenticationFilter
미인증된 클라이언트로부터 돌아온 WWW-Authenticate header를 보자.

- 유저가 인증되지 않은 요청으로 인가되지 않은 자원에 접근한다.
- Spring Security의
AuthorizattionFilter는AccessDeniedException에외를 던지며 인증되지 않은 요청이라고 알려준다. - 유저가 인증되지 않았기때문에
ExceptionTranslationFilter는 인증 시작을 시작한다. 설정된AuthenticationEntryPoint는BasicAuthenticationEntryPoint의 인스턴스이다. 이 인스턴스는 WWW-Authenticate header를 전송한다.
클라이언트에서 WWW-Authenticate header 수신받으면 로그인을 재시도 해야한다.
AuthorizationFilter
Spring Security는 요청 단계에서 인가(authorization)를 모델링할 수 있다. 예를들어 /admin 아래에 있는 모든 페이지들은 하나의 권한이 필요한 반면 다른 페이지들은 단순히 인증만 필요하다고 할 수 있다.
기본적으로 Spring Security는 모든 요청에 대한 인증을 요구한다. 즉, HttpSecurity를 사용을 하려면 나만의 인가 규칙을 선언해야한다.
HttpSecurity 인스턴스를 사용하려면 아래 짧은 코드라도 적어야한다.
1
2
3
4
http
    .authorizeHttpRequests((authorize) -> authorize
        .anyRequest().authenticated()
    )
이 짧은 코드는 어플리케이션 안에 있는 모든 엔드포인트들은 최소한의 인증이 필요하다는 것을 의미한다.
Understanding How Request Authorization Components Work
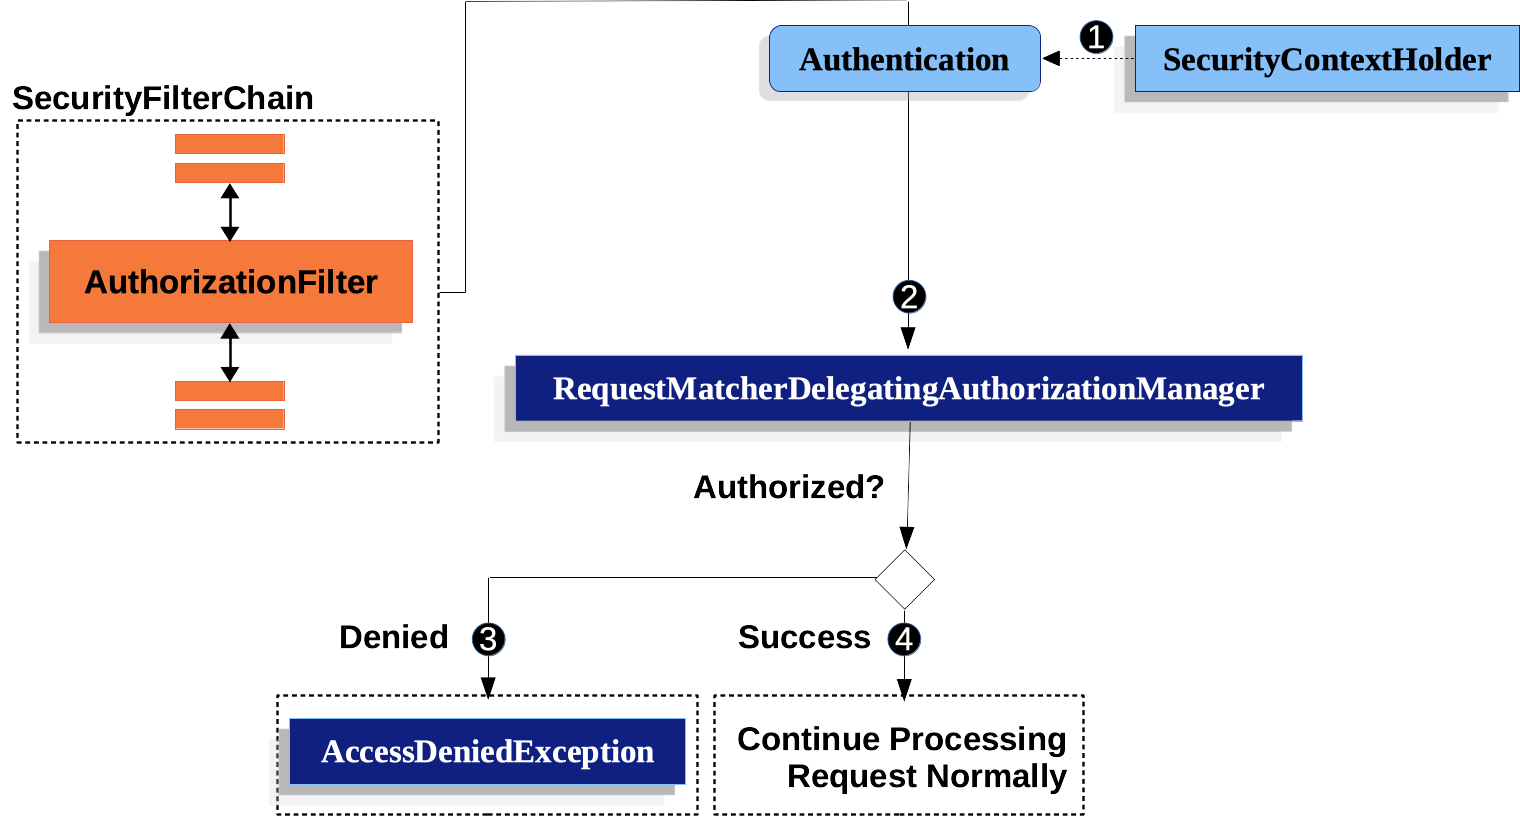
AuthorizationFilter는SecurityContextHolder를 이용해 인증(Authentication)을 진행하는Supplier를 생성한다.Supplier<Authentication>와HttpServletRequest를AuthorizationManager에게 전달한다.AuthorizationManager는 요청을authorizeHttpRequests와 연결하고 해당하는 규칙을 실행한다.- 만약 인가가 거절되면,
AuthorizationDeniedEvent가 발행되고AccessDeniedException예외가 던져진다. - 만약 인가가 승인되면,
AuthorizationGrantedEvent가 발행되고AuthorizationFilter가FilterChain과 함께 계속 실행된다.
- 만약 인가가 거절되면,
AuthorizationFilter Is Last By Default
기본적으로 AuthorizationFilter는 Spring Security filter chain의 끝에 위치한다. 이는 Security의 authentication filters, exploit protections 그리고 다른 필터들이 인가(authorization)를 요구하지 않는다는 뜻이다. 만약 AuthorizationFilter앞에 스스로 만든 필터를 넣어도 마찬가지로 인가(authorization)을 요구하지 않는다.
All Dispatches Are Authorized
AuthorizationFilter는 요청이 아닌 dispatch마다 실행된다. 즉, REQUEST dispatch는 인가(authorization)을 필요로 하다는 것을 시사한다. 뿐만 아니라 FORWARD, ERROR 그리고 INCLUDE들도 마찬가지로 인가가 필요하다.
예를 들어, Spring MVC는 요청을 Thymeleaf template를 렌더링하는 view resolver에게 FORWARD 할 수 있다.
1
2
3
4
5
6
7
@Controller
public class MyController {
    @GetMapping("/endpoint")
    public String endpoint() {
        return "endpoint";
    }
}
이 경우엔, 인가(authorization)가 총 두번 일어난다. 한번은 /endpoint에서 또 한번은 “endpoint” 템플릿을 렌더링하는 thymeleaf에 넘겨줄 때 일어난다.
이런 이유로, 우리는 모든 FORWARD dispatch를 허용하길 원한다.
이 원리의 다른 예시는 Spring이 에러를 어떻게 다루는 지에서 나타난다. 아래와 같은 예시가 발생한다고 가정하자.
1
2
3
4
5
6
7
@Controller
public class MyController {
    @GetMapping("/endpoint")
    public String endpoint() {
        throw new UnsupportedOperationException("unsupported");
    }
}
이 경우에도 인가(authorization)은 마찬가지로 두번 일어난다. /endpoint에서 한 번 그리고 error를 dispatch할 때 한 번 일어난다.
Authorizing an Endpoint
Spring Security가 진행 과정에서 각각 다른 규칙을 갖도록 설정할 수 있다.
만약 USER 권한이 있는 유저들만 /endpoint 에 접근할 수 있도록 하고싶다면 아래와 같이 작성하면 된다.
1
2
3
4
5
6
7
8
9
10
11
@Bean
SecurityFilterChain web(HttpSecurity http) throws Exception {
	http
		.authorizeHttpRequests((authorize) -> authorize
			.requestMatchers("/endpoint").hasAuthority('USER')
			.anyRequest().authenticated()
		)
        // ...

	return http.build();
}